
Nothing is worse than attempting to pack for one of our Circle 3 Productions projects and looking for something like an SD card in a mound of production equipment. We have tried hard to find ways to manage our gear so we always know where things are. As documentarians, we are constantly on run-and-gun projects and need to have our gear easily accessible. If you have unorganized chaos, it creates the potential for lots of slip-ups. Nuts and bolts, lens caps, and SD cards, all have their places… but only if you choose those places. Typically the best solution is creating organized systems that use containers, cases, bags, and more. Having such systems in place for your gear is imperative. This process should help you turn your unorganized chaos into organized bliss and have you on your way to fewer sleepless nights and more successful days on set.
STEP #1: ASK YOURSELF INSIGHTFUL QUESTIONS & RID YOURSELF OF CLUTTER

It is important to understand what your needs are. The easiest way to start organizing is to assess these needs - see what has to be organized, understand your inventory, be aware of how much space it takes up, and then break the process into sections.
For example, if you have a lot of tripods, understand how many you have, brainstorm the best way to store them, and ask yourself questions like, “How often do I use these? Is there one I use more than the others? Do I want this readily available?” Figuring out usage can not only help you prioritize where things should go but also if you even need each of those pieces of equipment in your life.
Sometimes, the best answer to organizing is to first just get rid of the stuff you don’t need. We may not be asking “Does this spark joy in our life,” like Marie Kondo, but we definitely want to ask ourselves those questions of “Do we actually use this on our production sets still? Does this gear **spark joy** in our creative process?” Take each piece of equipment one by one, answer these questions, and then chart your course from there.
STEP #2: CREATE AN INVENTORY LIST WITH AN APP OR ANOTHER PLATFORM
Now that you know what you want to keep, you need a space to see everything that you have listed out. Being able to create a system in this way is the best way to get started. It can seem daunting and overwhelming at first, but just remember to stay calm and confident throughout the process. Break your tasks down into smaller parts. We suggest taking inventory to start you off. There is an app that we use here at C3P that has been very helpful while organizing called MyGearVault. This app allows you to take inventory of all of your gear, break it down into categories, enter the worth of your gear, and also create “kits” that you can use as checklists for future projects (travel interview kit, music video kit, documentary kit, etc). The best part - it’s FREE!
Inventory is so important. It helps you not only to remember what you have but to keep track of every piece of gear you have from cords to cameras. Inventory allows you to have prices of your gear in case of theft, loss, or damage for insurance. It helps you know what you may need to purchase in the future, how long your warranties are, when you purchased the equipment, what gear you have rented/loaned, and most importantly, if you left something on set. So many reasons to inventory. Spend a couple of days doing this, then start organizing. Soon your gear will be out of your head and into a neatly organized spreadsheet.

Our gear rack!
STEP #3: SPREAD GEAR OUT ON A FLAT SURFACE & FIND YOUR GROUPS
After you inventory everything, it’s best to take all of it and lay it out where you can see each item. When spread out, it’s easier to gauge the size of the equipment and have an immediate view of what there is to organize. During this time, you want to decide where you want to place your gear and in what groups. Move individual items into groups. When groups become bigger and individual items become less, you’re going in the right direction.
For example, here at C3P, we have a large metal shelving unit (see images above), and each individual shelf is positioned to fit what we need for the categories we have. This includes a specified area to display our cameras, a storage bin with lighting accessories, our pelican case for audio, and even a pegboard next to the shelf to display and organize other items. Not all of this organizing process has to be about storing things away, it can also be about finding the perfect place to display your favorite gear - as we do with our cameras! Have fun with it!
When you decide where you would like to place items/categories, create labels. To do this, find something like a label maker or even tape pieces of paper in easy-to-see areas to specify categories. For our shelf, we used label holders (specific to our shelving unit) that clip onto our shelf with paper labels that you can slip into the clips. You will be amazed at what labeling categories will do for your sanity, creating even more space for artistic thoughts to thrive. This is all in preparation for the next step: collecting the small things.
STEP #4: START WITH THE SMALL THINGS
We file these little pouches away in larger bins. It is magic for whenever we need to pack for our next trip.
Are you holding on?
Let’s dive in deeper. So deep, in fact, that we’re at that part of your gear bags and backpacks where all the little things roam wild and free. If you are anything like us, you have a million cords, batteries, adapters, cage accessories, etc. We call this, the “spider’s nest.” We’ve all have had one at some point in time.
Not anymore!
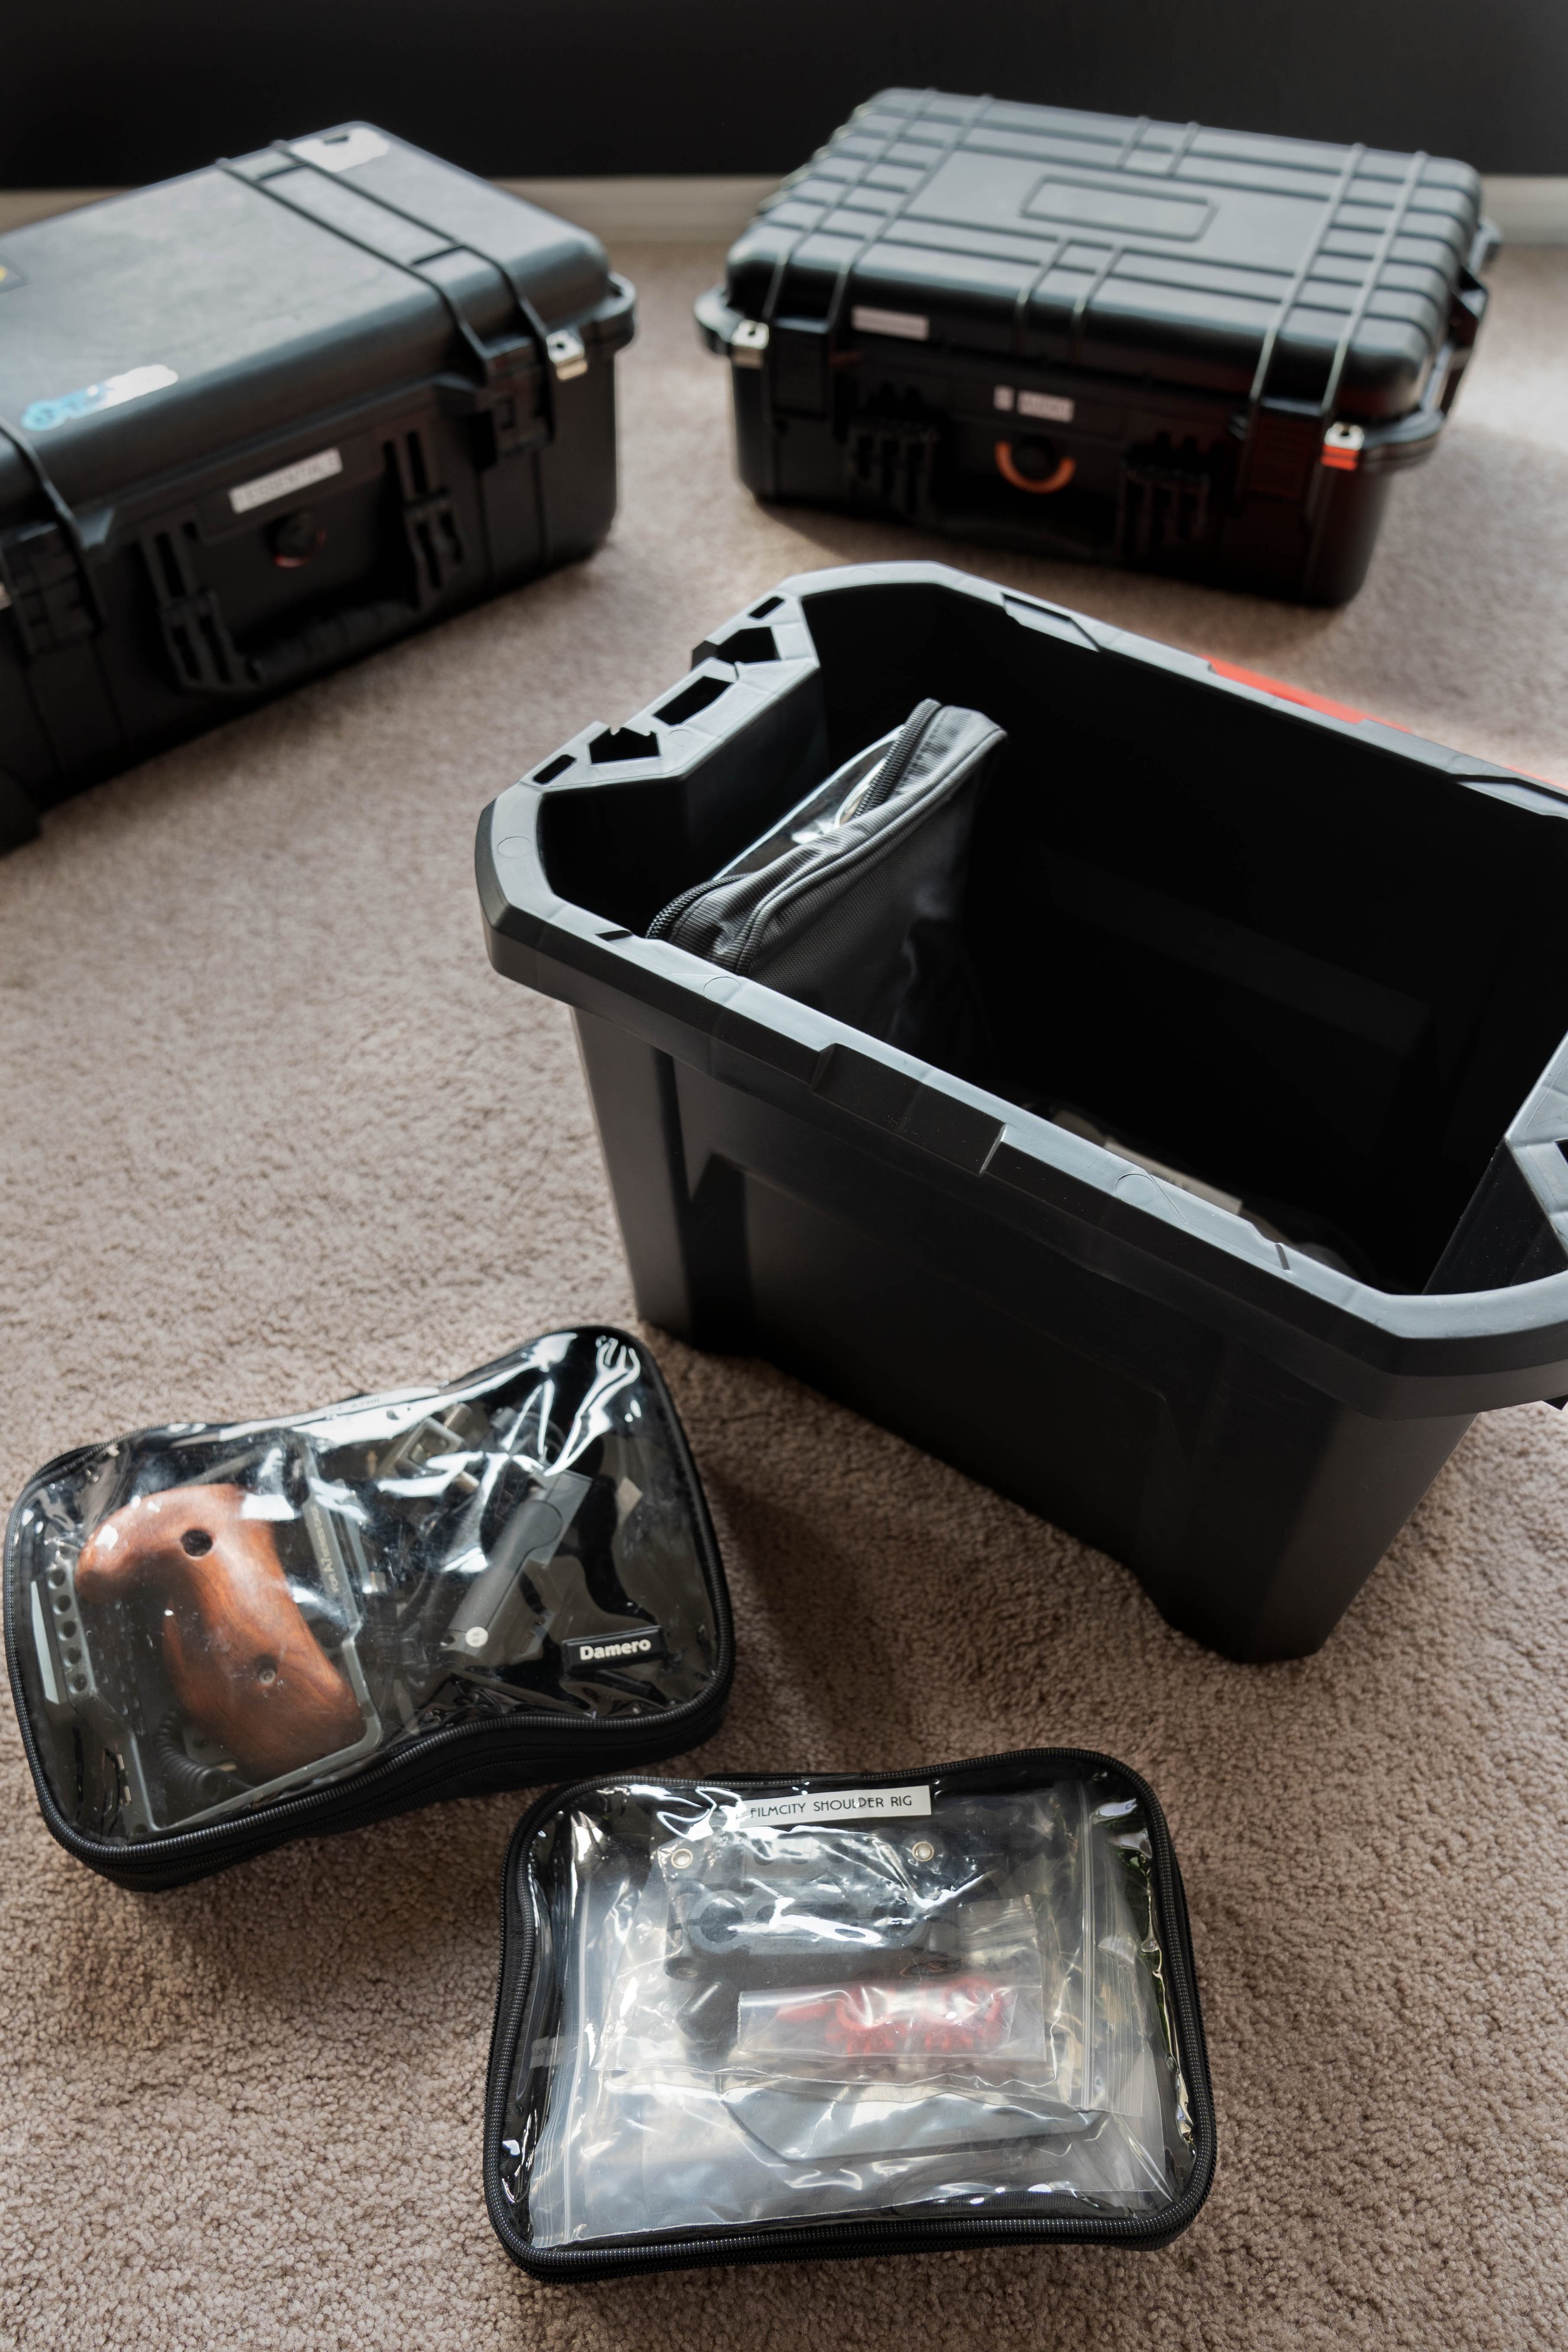
This step is fun because you can use what you have (like Ziploc bags) or go and buy a few items that will make your job so much easier. Either online or at a store, you will want to purchase specific pouches, bags, cases, bins, tubs, and whatever style of container to hold your items. (The bins, tubs, and containers you will use for the next step). You may now see the reason we spread everything out. Here at C3P, we use packing cubes like these for our small stuff.
Alternately, Amazon offers some great budget-friendly mesh packing cube bags that we also may use for travel as well. Bags like these are helpful for organizing your larger category bins later on because they allow you to “file away” your various pieces of gear. Systems like these produce better usability without having to dig around for something small. Everything has its place.
For example, take small items like monitor cords and put them in one pouch. Label that pouch “Monitor Cords.” Then, take something else small like a camera cage and put those in another pouch with a label on it. Continue this for each mini-category of gear. Once you have items in pouches with labels, then you can put those in a larger bin. You can separate the pouches into alphabetical order or you can separate them by job, color, or camera category… get creative with it! There’s no wrong way to do this if you do it with the purpose and intention of making your system effective.
Be relentless - organizing inside of the organization can be extremely rewarding in the long run, saving you from many headaches on set. We start with the small so when we move to the big, everything is already good to go!
(BONUS TIP: we use velcro cord wraps on every one of our cords and they make our cable management pouch a dream to open up now.)
STEP #5: EVERY POUCH HAS ITS PLACE. FIND LARGER BINS FOR EVERY CATEGORY.
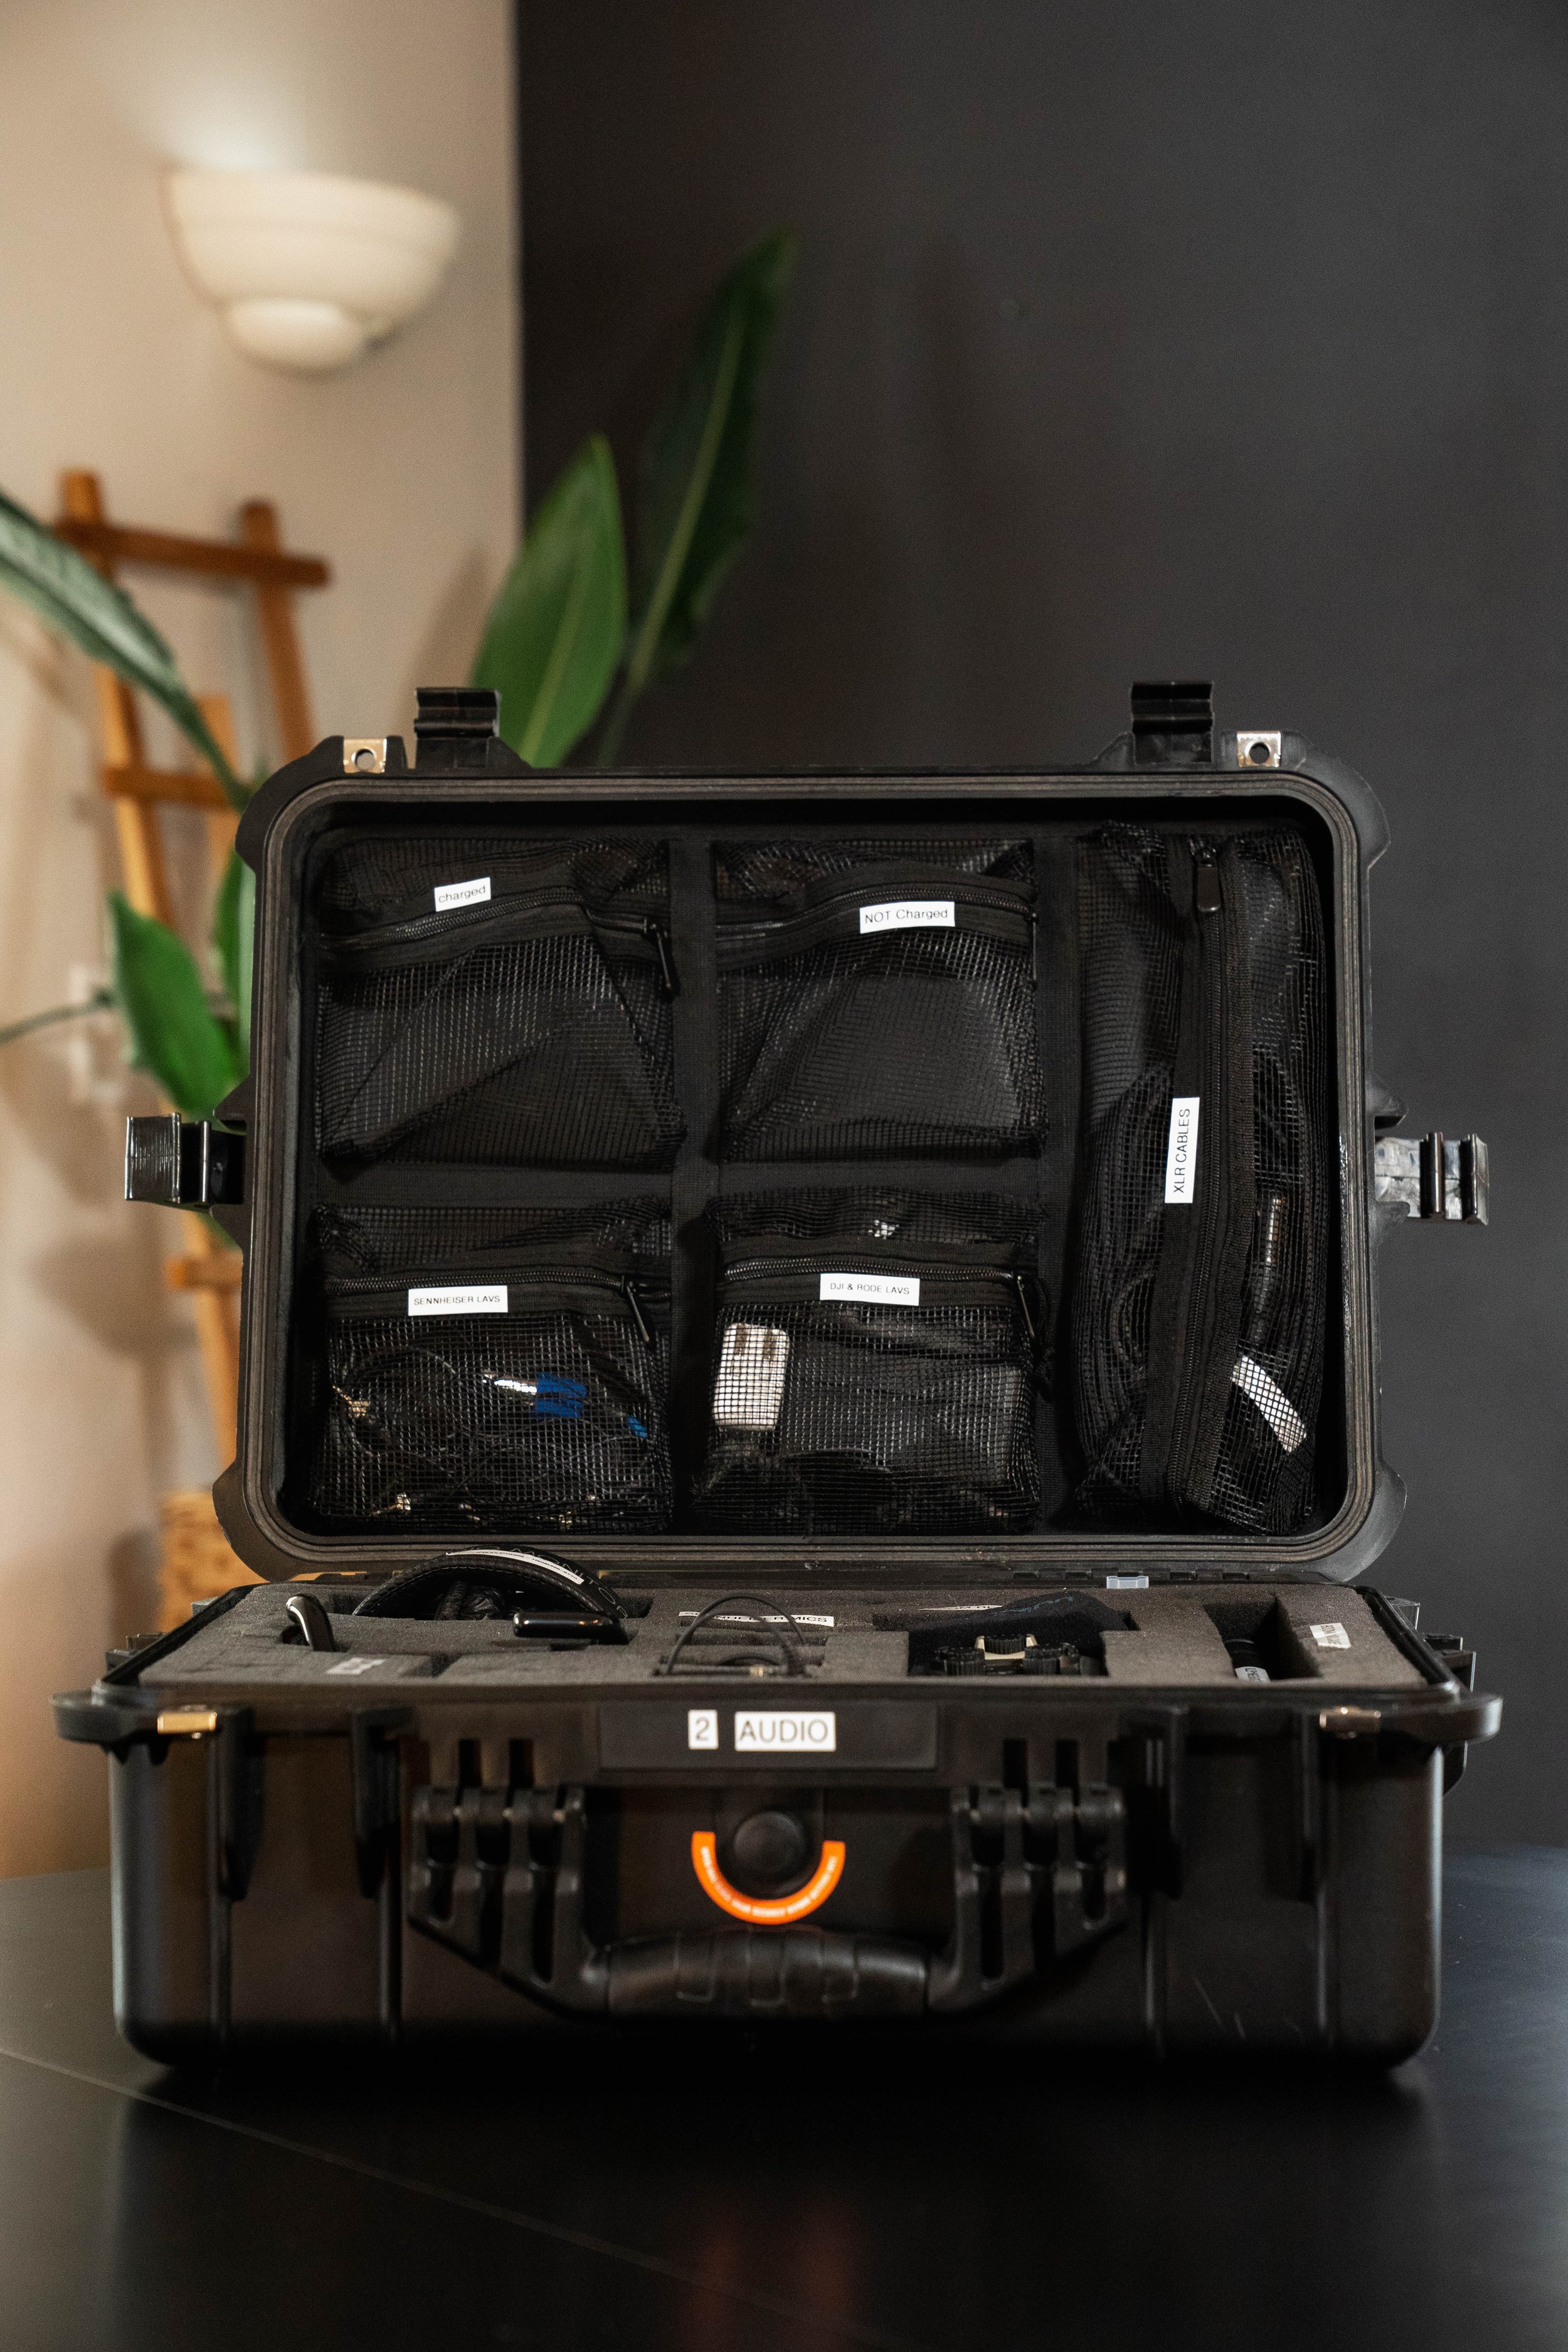
Our full audio case.
The trick to navigating all of this mess when it comes to organizing containers, tubs, and cases is to have a strategy. One strategy we had in mind was to organize the gear in a way that every piece of gear has a home, and any person handling our gear can easily find that home. Being that we typically work on projects with small teams, we usually need all hands on deck, which can sometimes mean even the documentary subjects handle our gear as well.
We wanted to create a system that was grab-and-go so we instantly can visually tell if we have all we need. For example, we have three hard cases of different sizes…
1) Small apache case // for our drone that fits the drone, three batteries, ND filters, and the remote and charger.
2) Large apache case // for our audio equipment that holds our recorder, headphones, LAV mics, cords, batteries, etc.
3) Large pelican rolling case // for our essentials that we take on set wherever we go.

A top down view of our audio case organization.
Within each of these drone, audio, or essentials cases, we have a system to organize all the necessary gear for that category. Here is an example. Years ago, our audio equipment was in multiple places, the batteries were in one place, the recorder was in another, the headphones, the LAVs, etc. everything was somewhere (really anywhere we could fit it in our bags) and it took a while to gather everything before we would go to set. We would spend hours just making sure every little item was somewhere amongst all our equipment… and that’s just for the sound gear!

The pouch insert fits neatly into the lid of our case.
Then, we purchased a larger case that would conveniently fit our “studio” of sound equipment inside! The case came with two layers of pull-apart foam inside, which made it perfect for making cutouts of our items. Spending the time to strategically find the right spot for the items inside inventory of our sound gear just a simple glance into the case for any empty holes in the foam. Not to mention, it also provided a secure and accident-safe environment for each item. There is also a pouch insert that we purchased for that case as well to hold batteries, mics, and cords.

A look at our essentials case. You can even see some of our pouches tucked away on the left hand side.
Gear protection and safety is of utmost importance for on-the-go documentarians like ourselves. From the wilderness of Kenya to the mountains of Peru, these cases can put up with pretty much anything. These cases help us a lot, though it isn’t totally necessary if you do more local or at-home projects. For projects that don’t require such heavy-duty cases, you can find cheap bins at places like Lowe’s, Harbor Freight, or even Walmart to suit your needs.
BONUS TIP: We found our Pelican-style cases (Apache) at Harbor Freight for a fraction of the price. They behave almost identically as the more expensive versions and have held up really well.
Inside our “essentials pelican case,” there is a sized cutout with zipper pouches that hold items in the lid. Inside the main part of the case, there are padded velcro dividers similar to what you often see in camera bags. This allows us to carry so many helpful tools that we always keep inside this case.

This has been such a time saver on set.
(BONUS TIP: One of our favorite organizational “inventions” is this retractable key holder with a flathead screwdriver on it and a baseplate screwdriver as well. (See image.) Whenever anyone is asking you for a quarter/screwdriver to attach that baseplate, you know right where to send them.)
TIP #6: NESTING IS YOUR BEST FRIEND
Now, you’ve created space on the shelves for all categories, organized your pouches, and labeled bins/larger cases. It’s finally time to start placing items in their homes. This is where you get to reap the rewards of all your hard work and watch how pleasing it is to see everything fall into place… literally!
When you finish, take a step back, look at all the work you have done, then maybe come back to it the next day with fresh eyes. You may want to make some minor adjustments… and that’s fine! This is the time to do it. It’s about making a system that works for you to know where everything is at and make your life easier. Iterate. Iterate. Iterate until your process is perfect and your gear organization feels like you can’t imagine it any other way.
Just a shout out to those who may be a little more crammed for space, too, because their production company is starting out of their college apartment (like we were once upon a time!) - that’s okay! Creating a system even in your closet, garage, or living room works. It just depends on your situation and the space you have. It’s about improving while using what you have. Start now, and your gear (and your brain) will forever thank you later.
Now that you hopefully have all the tools you need, you should have your wheels turning and your creative juices flowing. Some people just need an organized workspace to feel motivated (like us!) and we think that’s great! We wish you luck on your journey to creating working systems that bring productivity, ease of mind, and inspiration to your work.
Feel free to reach out to us if you have any questions about our gear organization! And please let us know if you have any additional tips you think we should add!
- Carter
Just a disclaimer, too - we are not organization experts. We are just a group of creatives that wants to share what we’ve learned to hopefully help us all create better art!
